Ah, an American classic. This makes about four juicy burgers.
INGREDIENTS AND PREPARATIONS :
If the hamburger/vegetable mixture does not stick together well, add 1 tsp. vegetable oil to the mix.
A larger spatula makes it easier to flip the patties. Always use a plastic spatula on nonstick surfaces.
The vinegar, mushrooms and scallions add a nice taste, but you can make the beef patties without them if you like.
Use 85 to 90 percent lean beef. Ultra lean beef will fall apart in the frying pan.
1. Put minced scallions and chopped mushrooms in bowl.
2. Set stove-top grill or burner to medium-high.
3. Add red wine vinegar.
4. Preheat nonstick frying pan. The pan is the correct temperature when a drop of water dances on its surface rather than sticking to it.
5. Add ground beef to bowl.
6. Place patties in the pan and cook for 2 to 3 minutes.
7. Flip patties and cook for another minute, and then add sliced cheese to the tops of patties if desired.
8. Mix everything together with your hands.
9. Cover pan and allow burgers to cook for a final 2 minutes. Cook 3 to 4 minutes for well-done burgers.
10. Flatten the beef into four patties that are 1/2-inch thick and 5 inches in diameter.
11. Remove hamburgers from pan and place in hamburger buns.
12. Add condiments and toppings such as ketchup, mustard, sliced tomatoes, lettuce, red onions and pickles.
Cook burgers well to avoid any chance of E. coli poisoning. Elderly people, children and pregnant women are at particular risk for problems with E. coli.
French toast is a delicious and classic addition to breakfast or brunch. It is an impressive breakfast dish, and it's easy to make. Neither particularly French nor toast, French toast is actually bread grilled in a mixture of eggs and milk. French toast is also a great way to use up bread that is becoming stale. In fact, older bread is actually better because it will absorb the egg/milk mixture without falling apart.
Make the French toast batter. First, crack the eggs in the bowl. Then add the milk, and whisk the eggs and milk together. This simple batter is the secret to making French toast.
Prepare the pan. Grease the pan, and then place it over medium heat. Allow it to warm while you prepare the toast. Place a little butter in the pan right before you add the bread to keep it from sticking.
Dip the bread. Dip each piece of bread in the batter, making sure both sides are coated. Leave the bread in the batter for just a minute to allow time for it to soak into the bread.
Cook the French toast. Place the battered bread on the warm pan. Sprinkle some cinnamon on the top of each piece of French toast. When the first side begins to brown, flip it to allow the other side to cook. Make sure that both sides are cooked thoroughly since the batter contains eggs. It should take about 2-3 minutes on each side for the French toast to turn golden brown.
Serve. Serve your French toast warm, with a dusting of powdered sugar and some maple syrup. It is also delicious with applesauce or jam. French toast can also be served as a dessert with chocolate sauce, sliced strawberries, and whipped cream.
French toast is an easy yet delicious breakfast that takes just a few minutes to make. Elegant yet simple, it is perfect for breakfast in bed, a large brunch, or even a simple weekday meal. You can double or even triple this recipe; count on 2 pieces of French toast per person. If you are making a large batch, keep the finished slices warm by placing them in the oven at 200 degrees until you're ready to serve them.
Easy fast french fries made from scratch! These are the best fries you will ever have.
Season them to your taste - salt & pepper? Curry? Cayenne and chili powder. Fresh garlic. Grated parmesan. Spicy mustard. No matter how you trick out these chips, they're guaranteed delicious.
PREPARATIONS :
STEP 1 MATERIALS:
Potatoes - 1 per person is more than enough!
1qt/ltr cooking oil - peanut oil is best
Seasonings - I just used salt, but this is where you can get creative!
Knife for cutting
Colander for rinsing
Pot for frying
STEP 2 CUT POTATOES
If you plan to keep the skins on (why wouldn't you!), scrub the potatoes well.
Cut potatoes into 1/4" fry shapes. Or fatter if you like "steak fries." I like em skinny and crisp!
Rinse cut potatoes in a large bowl with lots of cold running water until water becomes clear.
Cover with water by 1-inch and cover with ice. Refrigerate at least 30 minutes and up to 2 days.
STEP 3 HEAT OIL
In a large pan (or an electric deep fryer), heat oil over medium-low heat.
If you have a candy thermometer (recommended), heat until the thermometer registers 325 degrees F.
Make sure that you have at least 3 inches of space between the top of the oil and the top of the pan, as the oil will bubble up when the fries are added.
STEP 4 FIRST FRY
Drain ice water from cut fries and wrap potato pieces in a clean tea towel and thoroughly pat dry.
Increase the heat to medium-high and add fries, a handful at a time, to the hot oil.
Fry, stirring occasionally, until potatoes are soft and limp, about 8 to 10 minutes.
Using a skimmer or a slotted spoon, carefully remove fries from the oil and set aside to drain on paper towels.
Let rest for at least 10 minutes or up to 2 hours.
STEP 5 SECOND FRY
When ready to serve the French fries, reheat the oil to 350 degrees F.
Transfer the blanched potatoes to the hot oil and fry again, stirring frequently, until they reach desired brownness, 1-5 minutes. I like em almost burnt, so I left them in pretty long.
Transfer to paper towels again and sprinkle with seasoning to taste. Serve immediately.
These certainly don't taste as sinful as deep frying the fries, but it is an almost guilt-free alternative that tastes really good.
INGREDIENTS :
1 bag of your favorite frozen French fries (I like steak fries of the new "fast food fries")
nonstick cooking spray (preferable the olive oil stuff)
chili powder
salt
pepper
PREPARATIONS :
Place fries in a plastic bag and spray thoroughly with cooking spray.
Shake for a minute or so to distribute the oil.
Place on baking sheet (I find a baking stone works best) and sprinkle lightly with chili powder, salt and freshly ground pepper.
2.Cut potato into wedges. Mix olive oil, paprika, garlic powder, chili powder and onion powder together. Coat potatoes with oil/spice mixture and place on a baking sheet.
3.Bake for 45 minutes in preheated oven.
This is an easy way to make a great side dish for burgers!"
Please chose good ingredients (e.g. don't use cheap cheese) and you will have a pizza that is so much better than anything you can buy frozen.
One of these 11 inch pizzas comes in at under 2 pounds
INGREDIENTS : FOR THE BASE
500g flour (plain flour, we are using yeast here!)
4 tablespoons olive oil
1 teaspoon salt
2 teaspoons dried yeast
1/2 teaspoon sugar
FOR THE PIAZZAIOLA ( the tomato stuff to cover the base )
one onion
3 tablespoons olive oil
1/2 clove of garlic
1 400g tin of chopped tomatoes
1 teaspoon oregano
a couple of leafs of fresh basil
1/4 teaspoon of salt
a pinch of freshly ground pepper
TOPPINGS (per pizza) (use any cheese and topping you like, this is just an example)
one mozarella cheese (also nice: reggiano parmesan and medium cheddar)
2 slices of parma ham
2 slices of salami
Oven, pre-heating, temperature,
The type of oven you will be using has a huge influence on the outcome of your pizza. The best oven you can use is the old electrical type oven where you can set the heat to only come from underneath - that is ideal for pizza. Gas and fan assisted electrical ovens aren't very good - you might end up with a soggy pizza with burned cheese on top.
Oven temperature should be full blast - whatever oven you have. Make sure to pre-heat for quite a bit that you really have the maximum temperature that your oven get attain.
I have a lovely Smeg cooker with two ovens - one fan assisted and the other one a "traditional" electric oven which I can set to only heat the underside of the oven which works great for pizza.
Alternatively, you can use something like a Cobb Barbecue which also works well as all the heat comes from underneath.
PREPARATIONS :
Put the flour into a bowl
Mix the yeast with the sugar and 50ml of the lukewarm water and stir, let sit for 10 minutes until it develops a nice foam on top
Add the olive oil and salt to the flour
This is what the yeast will look like after 10 minutes. Now add the yeast to the flour, oil and salt and add the rest of the lukewarm water (250 ml). Mix with your hands and knead until you have a smooth dough
which should look like this! If you have any left-over dough, you can easily freeze it - I always make a bit more and keep the rest in the freezer for a quick supper
Cover the dough with a clean, dry dish towel and let it sit for an hour.
In the meantime, prepare a simple pizzaiola - chop the onion and the garlic, fry in the olive oil, add the tomatoes and the spices. Let simmer for half an hour to reduce the moisture, take a blender to it and then let it cool down.
This is what the dough will look like after it has risen. Now is the time to preheat your oven to full blast.
Take 1/3 of the dough ...
and spread it out into the pizza pan with your fingers. Let it sit for 10 to 15 minutes so it can rise again. If you want a very thin and crisp base, roll out the dough with a rolling pin instead of spreading it with your fingers.
Chop the mozarella.
Chop up your toppings - I'm using ham and salami here.
Spread the piazzaiola - best done by putting it into the middle and then moving the pan quickly back and forth.
Put on your toppings ...
Don't overdo it on the topping side - stick with 2 or 3 toppings and don't put on too much. An overloaded pizza isn't any good.
and then put on the cheese. Put into the pre-heated oven for approx. 20 minutes. If you find that your cheese starts to burn before the pizza base is done, put the pizza into the oven without the cheese for 5 minutes and then add the cheese - this is a hint I got from on Dianne Wilson - thanks Dianne!
20 minutes later - and look at that
Here is quite a different pizza - no pizzaiola, and lots of different vegetables with a cheddar cheese topping. Just to prove the point, we will bake this one on a Cobb barbecue
This is the result after 15 minutes under the closed lid - an incredibly crispy pizza - made on a barbecue! No idea if this will work on any other kind of barbecue but a Cobb - let me know if you succeed on another one.
I absolutely love cooking. I try and home cook most nights of the week (as I do love eating out too!). If in need of recipes then Cooking Light Recipes are fantastic and we all know that the magazine is well illustrated, thoughtfully laid out and generally full of great information. But like any magazine they are a little pricey and I know I can’t always afford to pick a copy up. So where can you get free Cooking Light Recipes?
Luckily for us… The Cooking Light website is laden with loads of awesome free recipes for us to try ourselves at home. The website is also laid out nicely and thoughtfully, very much like the magazine.
You can find all sorts of recipes in many many types and for many budgets. There are even plenty of vegetarian recipes for people like me.
One of my favorite recipes from the Cooking Light website is the Spinach and Ricotta Pizza. It’s veggie, pretty cheap and feels like a much more high end meal than say mac and cheese or beans on toast (as us English eat)!
I do however make a few variations to this already awesome recipe. Here is the Cooking Light
Firstly I use my own pizza base recipe that can be found here: Quick Flat Bread.
Then I use my own homemade tomato sauce but I simmer it for a little longer to thicken it up. Sometimes I blend it smooth sometimes I leave it chunky. This recipe can be found here: Spaghetti Sauce Recipe.
It’s really easy to make and can varied depending on what you have in the fridge.
They also have some other great recipes including burritos, pastas, salads and much much more. You can search here: Cooking Light Recipes.
So… have you made any of these meals or snacks using recipes found either in the Cooking Light magazine or website? As we all know they are almost always of the highest quality and if you make them as intended you will rarely get bad results…. If you do on any recipes I would love to know. I love making Pizza, Pasta, Curry, Mexican Food of all sorts and although I steer clear of them, I love the dessert recipes too. Especially chocolate based ones!
You may also be interested in another recent post of ours about Pampered Chef Recipes, another fantastic cooking and recipe resource.
Can you make better-than-takeout deep-dish pizza at home, in a reasonable amount of time?
The Problem
We began our quest for a good, homemade deep-dish pizza because most of the deep-dish pizzas to be had at restaurants or from takeout services simply aren't that good. Many of them, unfortunately, are oily disks of tasteless, soggy, heavy dough, overwhelmed by even greasier toppings.
The Goal
Because these pizzas are 75 percent crust, we wanted a recipe that would give center stage to a crust that was really good: rich-tasting, slightly chewy, and golden brown. We also wanted a recipe the home cook could produce in a moderate amount of time. We didn't want anyone wishing they'd gone for the greasy takeout version instead just to save time.
The Solution
The secret to a perfect crust came from an unlikely source: a potato. Also used in a recipe for focaccia dough that we liked, the potato contributed moisture as well as extra richness and sweetness to the dough. We cut down on the time required to ready the dough for baking by putting it in a barely warmed oven for the first rise. While the first rise usually takes an hour, this dough was ready to work with in only 35 minutes. Covering the pizza pan with oil before loading it with dough made for a densely caramelized crust that looked and tasted delicious. Finally, to keep the toppings from weighing down the crust and making it soggy, we precooked it for 15 minutes, giving it a chance to rise and firm up a bit. This practice ended up benefiting the toppings as well, which now had just enough time to heat through and melt or brown.
Chicago Style Deep Dish Pizza Recipe
Deep-dish pizza was born in Chicago, where it boasts a distinctively rich, flaky, biscuit-like crust. The problem? No pizzeria in Chicago would tell us how to make it.
The Problem
Bad deep-dish pizzas are doughy and tasteless, while recipes for the good versions are staunchly protected by the people who make them.
The Goal
We wanted a facsimile of the best of Chicago deep-dish pizzas: a thick crust with an airy, flaky inside, lightly crisp outside, and a rich taste that can hold its own under any kind of topping.
The Solution
The recipes we came across in our research sounded an awful lot like classic pizza dough: Combine flour, cornmeal, salt, sugar, and yeast in a large bowl, then add melted butter and water, transfer the ingredients to a stand mixer, and knead them into a dough. Allow the dough to rise, divide it in half, and let it rise again until doubled in size, then press the dough into a 9-inch round pan on a baking stone in a 500-degree oven. Our first impression when we followed these steps? Not bad. The butter flavor came through, and the cornmeal added a nice earthiness and crunch, but we wanted a crust with more flake and less chew. It occurred to us to try laminating. This baking term refers to the layering of butter and dough that creates ultra-flaky pastries through a sequence of rolling and folding. After melting part of the butter, we mixed it with the dough, allowed the dough to rise, and rolled it into a rectangle. We spread the remaining butter over the surface and rolled the dough into a cylinder to create layers of buttery dough. To amplify this effect, we then flattened the cylinder into a rectangle, divided it in half, and folded each half into thirds, like a business letter. There was just one small setback. All that handling caused the temperature of the dough to rise, so by the end of the process, the dough had warmed so much that almost all of the butter had melted, leading to a crust that was more tender and breadlike than flaky. The solution? Moving the dough into the refrigerator for its second rise so that any butter that had melted or gotten overly soft could firm up again. Our only additional tweak was adding oil to each pan to crisp the edges, which worked so well that we didn’t even need to use a pizza stone. With our crust all set, we considered the pizza’s other components. We favored freshly shredded mozzarella for its smooth texture and the way it formed a consistent barrier between dough and sauce. And we decided to use a thickened version of our Quick Tomato Sauce, which creates surprisingly complex flavor in a mere 15 minutes from canned crushed tomatoes. Spread over the cheese, this bright-tasting sauce won rave reviews from tasters.
Ultimately, a good pizza results from the balanced union of a well-cooked crust and appropriately selected toppings. The crust can be thin and crisp, risen and light, or thick and chewy, depending on how the dough is. The toppings can range from a simple combination of coarse salt, fresh herbs, and olive oil, to a spicily sauced, sausage-studded, cheese-and-vegetable melange.
INGREDIENTS :
1 tablespoon dry yeast
1/2 teaspoon sugar
2 2/3 cups warm water
2 tablespoons olive oil
7 1/2 cups unbleached all-purpose flour
1/4 cup whole-wheat or rye flour
1 tablespoon coarse salt or 2 teaspoons fine salt
PREPARATIONS :
Proof the yeast for 5 to 10 minutes in 1 cup of warm water and a pinch of sugar, until the yeast dissolves and the liquid begins to appear creamy.
Add the remaining water and 1 1/2 to 2 cups flour, including the whole-wheat or rye flour. Beat this well (a hundred strokes) until it’s smooth and soupy, and then let it stand for 10 to 15 minutes, until it’s bubbly and swollen. Add the salt and olive oil and proceed to stir in the rest of the flour by the cupful until the dough is stiff but still slightly sticky. Tip: Stir the dough in the same direction so that the gluten strands retain a smooth, consistent pattern.
When the dough begins to form a cohesive mass that’s thick enough to hold its shape, turn it out onto a lightly floured surface and let it rest. Meanwhile, clean and oil the bowl. Knead the dough, turning it clockwise by quarter turns and sprinkling a little flour on top and on the surface underneath before folding it over. Add just enough flour so the dough doesn’t stick and tear. (A dough scraper is invaluable for lifting the mass of dough cleanly from the counter.) Kneading takes about 5 to 8 minutes. When the dough is smooth, springy, and pliant -- earlobe-soft -- return it to the oiled bowl, cover it with a damp cloth, and let it rise until doubled. This generally takes between 35 and 45 minutes at 70 to 75 degrees.
After the first rise, you can form the crust, assemble the pizza and bake it immediately or punch the dough down and let it rise again before baking. This doesn’t substantially change the resulting crust, but it gives you more time if you need it before baking the pizza. Or, you can refrigerate the dough for several hours or up to two days. In this case, give it a final punch down after it has chilled for about 40 minutes and put it in a plastic bag.
By letting the dough mature in the refrigerator, the gluten ripens and relaxes and the dough becomes less sticky, and will stretch farther when working with it. With this refrigerated dough, you can obtain a thin, crisp crust, or a thick, chewy crust, depending on how thin you roll or stretch the dough when forming it, and on whether or not you allow it to warm up and rise before baking it. A thick crust made from chilled dough is likely to have larger air bubbles and be less delicate and more chewy--rather like the difference between regular and sourdough breads.
OPTIONS FOR THE CRUST:
For a light, risen crust, use a freshly made dough, although you can use a chilled dough. For the highest, puffiest results, add 2 teaspoons more yeast to the recipe and use the dough within three hours of making it. For a finer-textured crust, simply roll it out thinner and let it rise to the same height. Let the dough rise until it’s puffy, and fingerprints disappear when dough is pressed. This takes about 10 minutes with freshly made, room-temperature dough, or about 15 minutes with chilled dough.
A thick, chewy crust can be made either with fresh or chilled dough. Stretch or press the dough to about 1/3 to 1/2 inch thick and let it rise just slightly. Whether you’ll end up with a thick and chewy crust or a light and risen one depends on how thick you roll it out and how high you let it rise.
For a thin, crisp crust, use dough straight out of the refrigerator. Roll it out as thin as you want it -- usually about 1/4 inch -- and get it into the oven within minutes, before it has a chance to rise.
Assemble the pizza on an oiled, rimless cookie sheet. A third of the recipe will make a 12- to 16-inch round crust, depending on how thin you roll or spread it. Lightly form the dough into a ball and stretch it out. First, hold it vertically by one edge and turn it in your hands, allowing gravity to stretch it as you turn it. Then lay it on the cookie sheet and press out the dough, starting from the center. Be careful not to tear or poke holes in the dough. A floured rolling pin is handy for rolling out thin crusts. If the dough springs back, let it rest a minute or two, or chill it in the fridge, and then continue to work it out.
Arrange the toppings, usually three to four items, so that they don’t overlap. Apply the cheese a little more than halfway through the baking process. By adding the cheese when the crust is just lightly browned, you can tell when the topping is sufficiently cooked and also avoid overbrowned, leathery cheese and an undercooked crust. Those toppings that don’t need much cooking, like blanched spinach or asparagus, paper-thin prosciutto, or steamed shellfish, also go on at halftime, along with the cheese.
Bake pizza in a very hot oven -- 475 degrees -- on a heavy baking sheets and on a baking stone. Check the pizza during baking and rotate it if it appears to be cooking unevenly. Lift the crust to see how it’s cooking underneath. If the bottom is still pale while the top seems almost done, turn the oven temperature down and leave the pizza in longer.
When the crust is lightly browned and the toppings are cooked, sprinkle on the cheeses. Then bake the pizza an additional 8 to 10 minutes, or until the cheese is melted and bubbly. By this time, the crust will be perfectly done.
What to do when your 8-year old nephew comes to visit? Make pizza, of course! Well, not of course, actually. I didn't think of it until we exhausted Sorry, Monopoly, and gin rummy. But it did turn out to be a brilliant idea as dad had just received a baking stone for Christmas, and my nephew Austin loves pizza. I told him if he helped me make it and didn't make too many faces I would put him on my website and he would be famous. That seemed to get his attention. He thought the dough was "slimy and gross" but he loved picking his own toppings, and the finished product was "awesome".
The following method I patched together from recipes in both Joy of Cooking and Cook's Illustrated The Best Recipe. I made two batches of dough, four pizzas in all, with varied toppings. Next time I'll be a bit more patient with stretching out the dough so I can get it even thinner. Look to the end of this post for some excellent links about pizza from other food bloggers.
INGREDIETS : Pizza Dough : Makes enough dough for two 10-12 inch pizzas
1 1/2 cups warm water (105°F-115°F)
1 package (2 1/4 teaspoons) of active dry yeast (check the expiration date on the package)
3 1/2 cups bread flour (can use all-purpose but bread flour will give you a crisper crust)
2 Tbsp olive oil
2 teaspoons salt
1 teaspoon sugar Pizza ingredients :
Olive oil
Cornmeal (to slide the pizza onto the pizza stone)
Tomato sauce
Mozzarella or Parmesan cheese, shredded
Feta cheese
Mushrooms, thinly sliced
Bell peppers, stems and seeds removed, thinly sliced
Italian sausage, cooked ahead
Chopped fresh basil
Pesto
Pepperoni, thinly sliced
Onions, thinly sliced
Sliced ham Special equipment needed
A pizza stone, highly recommended if you want your pizza dough to be crusty
A pizza peel or a flat baking sheet
A pizza wheel for cutting the pizza, not required, but easier to deal with than a knife
PREPARATIONS : Making the Pizza Dough
1 In the large bowl of a heavy duty electric mixer (such as a Kitchen Aid), add the warm water. Sprinkle on the yeast and let sit for 5 minutes until the yeast is dissolved. Stir to dissolve completely if needed at the end of 5 minutes.
2 Attach a mixing paddle to the mixer. Mix in the olive oil, flour, salt and sugar on low speed for about a minute. Remove the mixing paddle and replace with a dough hook. Knead using the mixer and dough hook, on low to medium speed, until the dough is smooth and elastic, about 10 minutes. If you don't have a mixer, you can mix and knead by hand. If the dough seems a little too wet, sprinkle on a bit more flour.
3 Place ball of dough in a bowl that has been coated lightly with olive oil. Turn the dough around in the bowl so that it gets coated with the oil. Cover with plastic wrap. Let sit in a warm place (75-85°F) until it doubles in size, about 1 to 1 1/2 hours (or several hours longer). If you don't have a warm spot in the house you can heat the oven to 150 degrees, and then turn off the oven. Place the bowl of dough in this warmed oven to rise.
At this point, if you want to make ahead, you can freeze the dough in an airtight container for up to two weeks.
Preparing the Pizzas
1 Place a pizza stone on a rack in the lower third of your oven. Preheat the oven to 450°F for at least 30 minutes, preferably an hour.
2 Remove the plastic cover from the dough and punch the dough down so it deflates a bit. Divide the dough in half. Form two round balls of dough. Place each in its own bowl, cover with plastic and let sit for 10 minutes.
3 Prepare your desired toppings. Note that you are not going to want to load up each pizza with a lot of toppings as the crust will end up not crisp that way. About a third a cup each of tomato sauce and cheese would be sufficient for one pizza. One to two mushrooms thinly sliced will cover a pizza.
4 Working one ball of dough at a time, take one ball of dough and flatten it with your hands on a slightly floured work surface. Starting at the center and working outwards, use your fingertips to press the dough to 1/2-inch thick. Turn and stretch the dough until it will not stretch further. Let the dough relax 5 minutes and then continue to stretch it until it reaches the desired diameter - 10 to 12 inches. Use your palm to flatten the edge of the dough where it is thicker. You can pinch the very edges if you want to form a lip.
5 Brush the top of the dough with olive oil (to prevent it from getting soggy from the toppings). Use your finger tips to press down and make dents along the surface of the dough to prevent bubbling. Let rest another 5 minutes.
Repeat with the second ball of dough.
6 Lightly sprinkle your pizza peel (or flat baking sheet) with corn meal. Transfer one prepared flattened dough to the pizza peel. If the dough has lost its shape in the transfer, lightly shape it to the desired dimensions.
7 Spoon on the tomato sauce, sprinkle with cheese, and place your desired toppings on the pizza.
8 Sprinkle some cornmeal on the baking stone in the oven (watch your hands, the oven is hot!). Gently shake the peel to see if the dough will easily slide, if not, gently lift up the edges of the pizza and add a bit more cornmeal. Slide the pizza off of the peel and on to the baking stone in the oven. Bake pizza one at a time until the crust is browned and the cheese is golden, about 10-15 minutes. If you want, toward the end of the cooking time you can sprinkle on a little more cheese.
The grill is a very nostalgic thing. Most people remember their fathers standing over the grill during the summer and braving the huge flames to turn out some burnt hot dogs and shriveled hockey pucks posing as hamburgers. Those simple items have advanced now and some people make their teriyaki tofu with asparagus spears. Some like to cook other meats like pork chops and steaks in place of hamburgers and brats and other sausages instead of simple hot dogs. I'm a huge chicken fan myself. But every once in a while I like to revisit my childhood and wrap my lips around a great burger. I don't have my father's grill. My grill runs off of gas and is easily controlled. His was a fire hazard that made a huge mess each time it was lit.
The convenience of the gas grill prompted me to a play around with some burger recipes frequently until I found one that I absolutely love. It's ridiculously simple and utterly fantastic. This burger recipe is a thick and juicy beef burger smothered in Monterey jack and white cheddar cheese with grilled onions and a toasted bun. I even threw in a chipotle mayonnaise with a lot of black pepper for an extra kick.
Ultimate Grilled Cheeseburgers:
This burger is going to be screaming with bold flavors. At the store, pay attention to the fat content of your hamburger. I don't necessarily care for one cut of beef over the other for this recipe. Ground round, chuck, whatever you can find will work just fine. Make sure it has at least 20% fat content, however. Next, we'll need a small bottle of liquid smoke, a bottle of Worcestershire sauce, an big onion, (yellow, white, red, it doesn't matter) a can of chipotle peppers, white cheddar and jack cheese, mayonnaise if you don't have it. Be sure to pick up your favorite hamburger buns. And if you want anymore fixings like lettuce, tomato, pickles, then be sure to grab them.
Mixing the burgers should be easy. Just place the meat into a big bowl, add 1 tablespoon of liquid smoke, 1 tablespoon of Worcestershire sauce and some salt and pepper to taste. And my secret ingredient for holding these burgers together is 1 medium sized egg. These amounts are based on 1 pound of beef. For every extra pound, add another tablespoon and another egg. 1 pound should yield approximately 4 burgers. After mixed, begin to form the burger shape and place on a platter or cookie sheet.
Turn your grill to medium and let it heat up for 10 minutes or so. While the grill's getting warm, we want to mix that chipotle mayonnaise. In a blender, mix 1 cup of mayo with 3 of the chipotle peppers and some of the red sauce in the can, then add some black pepper to taste and blend together. If you want, you can spruce this up with anything in your house: mustard, lime juice, bourbon, etc. This recipe is really spicy so if you're concerned with the heat, just use 1 or 2 peppers.
Peel your onion and cut it in slices about ¼ inches thick. Make sure to place these onions on your grills racks with the burgers. Turn then when you turn the burgers. Once the grill is hot, place the burgers on. They should cook relatively quickly and the fire will begin to flame broil the burgers when the fat starts to drip out. Let them cook for 5 minutes per side, cut the heat completely off, and add the cheese to each burger. I use a lot of cheese and let it melt on for about 5 minutes. Also, before closing the lid with the heat off, place your hamburger burns, cut side down, on the grill racks to let them get toasted. Brush the buns with the chipotle mayonnaise and build the burger you want. These burgers are amazing and you will definitely want more than one.
Learn to cook hot dogs six different ways for when you are short on time, or short on money. A hot dog is an easy choice for lunch or dinner. Hot dogs certainly aren't the picture of healthy eating, but if you're eating a varied and balanced diet, a hot dog once in a while isn't so horrible. There are many ways to prepare a hot dog, each creating a different taste and texture. Experiment with different hot dog brands until you find your favorite.
STEP 1 :
Microwave. I was surprised to find out when a friend of mine had no idea you could cook hot dogs in the microwave. This is my preferred method and how we ate them growing up. Just pop the hot dog on a plate in the microwave and cook for 30-45 seconds. Just that fast, it's cooked and ready to eat.
STEP 2 :
Boiled. Boiling hot dogs is a popular way to prepare them. This is a very easy way to cook hot dogs and will yield a different texture than with some of the other cooking methods. Bring a pot of water to boil, make sure it is enough to cover your hot dogs. Once boiling, add the hot dogs and turn your water down to medium-high and cook for 6 to 7 minutes. Try boiling hot dogs in beer for a different flavor.
STEP 3 :
Oven cooked. To cook hot dogs in the oven makes them very yummy. If you're planning on a quick dinner, turn the oven to 425 or 450 degrees and throw in some frozen french fries per the package directions. When there is about 10-12 minutes left on your fries add the hot dogs to the same pan the fries are on in the oven. Roll them around a few times while they are cooking and make sure that don't overcook.
STEP 4:
Pigs 'n the blanket. Cooking hot dogs this way is super easy and fun for the little ones. Buy a pack of hot dogs and 2 cans of 8 count crescent rolls. Heat your oven per the crescent roll package directions. Cut the uncooked hot dogs in half and wrap with the uncooked dough. You can cut a slit in your hot dog and put in cheese before rolling it up. Cook for 12 to 15 minutes, or until the dough is cooked through. You may need to flip them around a bit as they brown on the bottom.
STEP 5:
Campfire. If you're lucky enough to have a big enough yard for an approved campfire, why not throw some hot dogs on the fire? You can use sticks or skewers to cook hot dogs over the fire until they are heated through. No room for a fire in your yard? Check out a self-contained fire pit that can be purchased for less than $100.
STEP 6 :
Grilled. Having a cook out, or just whipping up dinner, to cook hot dogs on the grill is quick and easy. Heat your grill to a medium-high heat and add the hot dogs. Cook until the hot dogs are heated through. Make sure to turn them while cooking, for about 10 minutes.
If take-out burgers call your name, this is, hands down, the Biggest Loser burger recipe for you! It’s much leaner than any burger you’ll find at a fast food restaurant, but the sauce makes it taste so reminiscent of them. For variety, you might try making your burger recipe with a low-carb tortilla instead of a hamburger bun and adding a few more pickles.
INGREDIENTS :
1 tablespoon low-fat mayonnaise
1/2 teaspoon ketchup
1/2 teaspoon yellow mustard
1/4 pound 96% lean ground beef
1 slice (3/4 ounce) fat-free American cheese (optional)
1 whole-grain or whole-wheat hamburger bun
1/4 cup chopped romaine lettuce leaves
1 thin slice red onion
3 dill pickle rounds
PREPARATIONS :
In a small bowl, combine the mayonnaise, ketchup, and mustard. Stir to mix. Set aside. Shape the beef into a patty that is about 1/2" wider than the bun.
Preheat a medium nonstick skillet or grill rack on high heat. Place the patty on the pan or grill. Cook for 1 to 2 minutes per side, or until desired doneness. (Do not smash the burger with the spatula.) About 30 seconds before the burger is cooked, top with the cheese, if desired. Place the bun halves, cut sides down, on the pan or grill. Cook for about 45 seconds, or until toasted.
Place the bun bottom on a serving plate. Top with the patty, lettuce, onion, and pickles. Spread the reserved sauce evenly over the inside of the bun top. Flip onto the burger. Serve immediately.
OTHER RECIPES :
INGREDIENTS :
2 pounds ground beef, lean
1 tablespoon steak sauce, your favorite
1 teaspoon Worcestershire sauce
1/4 teaspoon hot pepper sauce
2 teaspoons salt
1/2 teaspoon pepper
1 1/2 cups shredded American or mild Cheddar cheese
1/2 cup finely chopped onion
PREPARATIONS :
Combine ground beef, steak sauce, Worcestershire sauce, hot sauce, salt, and pepper. Shape mixture into 8 hamburger patties. Broil patties 4 inches from heat for 6 minutes. Turn and broil for 4 to 6 minutes longer, to desired doneness. Combine cheese and onion; place on patties then broil until cheese is melted. Serve on toasted hamburger buns.
INGREDIENTS :
2 pounds ground turkey breast
4 scallions, finely chopped
1/3 cup chopped flat-leaf parsley (a generous handful)
1 tablespoon grill seasoning
1 teaspoon poultry seasoning
2 tablespoons extra-virgin olive oil (EVOO)
1 apple, such as granny smith, cut into 12 slices
8 slices extra-sharp cheddar cheese
1/4 cup whole-berry cranberry sauce
2 tablespoons grainy mustard
4 sandwich-size english muffins, split and toasted
8 leaves red- or green-leaf lettuce
PREPARATIONS :
In a bowl, combine the turkey, scallions, parsley, grill seasoning and poultry seasoning. Form into 4 patties, pressing your thumb into the center of each to prevent it from bulging.
In a large skillet, heat the EVOO, 2 turns of the pan, over medium-high heat. Add the patties and cook for 6 minutes on each side for medium. Top each with 3 apple slices and 2 cheese slices, tent the pan with foil and cook until the cheese melts, 1 to 2 minutes.
In a small bowl, mix together the cranberry sauce and mustard; slather on the muffin tops. Pile 2 lettuce leaves on each muffin bottom, top with the patties and set the muffin tops into place.
The elements of the perfect hamburger are a patty of ground beef in a soft round bun, served with ketchup, pickles, and onions. You may add other condiments, whatever you like, but the meat itself must be of prime quality or it’s not worth the effort. What people prefer on their hamburger can vary from region to region in the United States.
Great American Hamburger :
1 1/2 pounds lean ground beef (hamburger)
Salt and pepper
4 hamburger buns or Kaiser rolls
2 tablespoons butter, melted
Accompaniments (see below)
Preheat barbecue grill; brush and oil the grates.
Lightly wet your hands with cold water; gently form ground beef into 4 patties, about 1-inch thick and larger than your bun. When forming patties, handle as little as possible. Loosely packed burgers are crisper on the outside and juicier inside. Poke a hole in the center (this will stop the hamburger from rising in the center. The hole will close while cooking). Season with salt and pepper.
Place patties onto hot grill. Cover barbecue with lid, open any vents, and cook 4 to 5 minutes; turn patties over and cook another 4 to 5 minutes (only turn patties once) or until cooked to desired doneness (do not press patties with spatula while cooking as juices will escape and the meat will dry out). Remove from grill and transfer onto a serving plate. NOTE: It is recommended that you cook the Hamburger patty to 160 degrees on your meat thermometer to eliminate any chance of e-coli.
Brush the hamburger buns or Kaiser rolls with melted butter; toast them on the grill, cut side down for 30 to 60 seconds. remove from grill and place on individual plates. Place the cooked meat onto the bottom slice of the bun and add accompaniments of your choice (see below).
I wouldn't change a thing here with this recipe. It is, indeed, what I term "recipe perfection".
As a matter of fact, if beef steaks are on sale, I think I'll add this one to the menu. I have green peppers ready in the garden I can use in place of the poblanos.
INGREDIENTS :
1 bunch fresh parsley
1 bunch fresh cilantro
1 to 2 cloves garlic
1 large red onion, halved and sliced
Kosher salt and freshly ground pepper
2 tablespoons red wine vinegar
3 tablespoons lemon juice
1/2 cup plus 1 tablespoon extra-virgin olive oil
1 pound chuck or top round steak (London broil)
3 poblano peppers, seeded and cut into strips
1/4 cup lager beer
8 8-inch flour tortillas
Lime wedges, for serving (optional)
PREPARATIONS :
Combine the parsley and cilantro, garlic, half of the sliced onion, 1 tablespoon salt, 1 teaspoon pepper, vinegar, 2 tablespoons lemon juice and 1/2 cup olive oil in a food processor; blend into a thick and smooth chimichurri sauce.
Pierce both sides of the steak with a fork several times; place in a resealable plastic bag and add half of the sauce. Seal the bag and turn to coat the steak; refrigerate for at least 1 hour. Reserve the remaining sauce in a covered container.
Preheat a grill over medium-high heat. Remove the steak from the bag, discarding sauce; grill til desired doneness is reached. Let rest before slicing.
Meanwhile, heat the remaining 1 tablespoon olive oil in a large skillet over medium-high heat. Add the peppers and the remaining sliced onion half; season with salt and pepper. Saute until the vegetables are softened and caramelized around the edges, about 8 minutes. Add the beer, cover and cook until the peppers are tender, about 5 minutes.
Warm the tortillas on the grill. Thinly slice the steak on the bias; divide among the tortillas along with the peppers and onions. Thin the reserved chimichurri sauce with the remaining 1 tablespoon lemon juice; drizzle over the fajitas. Serve with lime wedges, if desired.
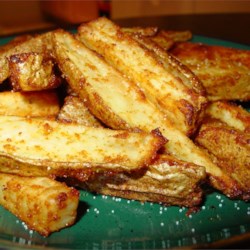
INGREDIENTS : 6 large red potatoes, skins on
Oil, for frying
1 large sweet onion
Salt and pepper
PREPARATIONS :
Using a large pot, boil potatoes with skins on until almost done. Allow to cool, and cut potatoes into long strips, approximately 1/4 to 1/2-inch wide and thick. In a large pot or fryer, heat oil to 350 degrees. Par-fry the potatoes for 5 to 6 minutes. Potatoes should be limp. Remove potatoes and place onto paper towels and allow to drain. Let sit for 1 to 2 hours at room temperature.
Cut onions into 1/2-inch wedges. Just before serving time, place potatoes and onions into oil heated to 375 degrees F for 3 to 5 minutes, or until brown. Remove fries from oil, drain on paper towel, and while still hot, season with salt and pepper
INGREDIENTS :
1 package active dry or fresh yeast
1 teaspoon honey
1 cup warm water, 105 to 115 degrees F
3 cups all-purpose flour
1 teaspoon kosher salt
1 tablespoon extra-virgin olive oil, plus additional for brushing
PREPARATIONS :
In a small bowl, dissolve the yeast and honey in 1/4 cup warm water.
In a food processor, combine the flour and the salt. Add the oil, the yeast mixture, and the remaining 3/4 cup of water and process until the mixture forms a ball. (The pizza dough can also be made in a mixer fitted with a dough hook. Mix on low speed until the mixture comes cleanly away from the sides of the bowl and starts to climb up the dough hook).
Turn the dough out onto a clean work surface and knead by hand 2 or 3 minutes longer. The dough should be smooth and firm. Cover the dough with a clean, damp towel and let it rise in a cool spot for about 2 hours. (When ready, the dough will stretch as it is lightly pulled).
Divide the dough into 4 balls, about 6 ounces each. Work each ball by pulling down the sides and tucking under the bottom of the ball. Repeat 4 or 5 times. Then on a smooth, unfloured surface, roll the ball under the palm of your hand until the top of the dough is smooth and firm, about 1 minute. Cover the dough with a damp towel and let rest 1 hour. At this point, the balls can be wrapped in plastic and refrigerated for up to 2 days.